Have you ever wanted to combine a collage of photos and upload them onto your blog or print them out? Storyboards are essentially photo collages. When I had my photography business, clients always wanted to purchase them as they are visually appealing. They are becoming more prevalent on blogs as you can add a lot of photos to a “board.” I like using them on a blog as it makes the blog space clean and uncluttered. You can make them in Adobe Lightroom, Photoshop Elements, or any version of Photoshop. You can design several and save them as PSD (Photoshop) files, then just drag and drop the photos onto the PSD.
I will be using Photoshop but you can alter these instructions to the software you are using. Open up Photoshop, click File >New and a pop-up window will ask you for the title, dimensions, and resolution of your document. I type in StoryBoard (if I am using 300 dpi) or BlogBoard (if I’m using 180 or 240 dpi for my blog.) Type in the dimensions you want for your storyboard; it can be large, say 11″ or 16″ x 14″ or 20″, but for this exercise and for the web, I made it 7″ x 9″. Another useful size is the good ole’ 8″ x 10″. Type in the resolution and click OK. I kept the background color white but you can change it to any color you prefer.
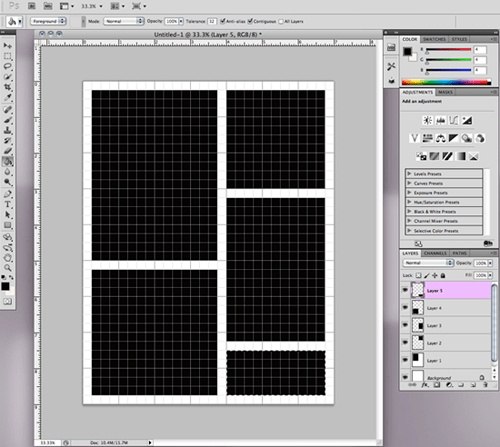
Duplicate the layer by holding Command C (Mac) or Control C (PC), go to the top menu, select View, then Grid. This will make it easier to design the board. Also under View and Grid, be sure Smart Guides is selected. At the bottom of the Layers panel, click on the second icon on the bottom right (to the left of the trash can) and select Create New Layer. Then select the Marquee tool on the left side toolbar panel. Click onto the grid layer and make a square or rectangle. After you have made your shape, select the Paint Bucket (under the Gradient tool on the toolbar panel) or hit ‘G’ to bring up that particular toolset. Select your fill color; I chose black but again, it’s a matter of preference.
After you have filled the shape, continue to use the marquee tool and paint bucket to create all of your board shapes. The Smart Guide will be a pink line to show you how you are lining up to the previously created shapes. Once your storyboard is finished, go to View and turn off the grid. At this point, I save my board as a PSD file so I can edit it or continue to use it repeatedly. Select the top arrow of the toolbar panel (the Move tool), and select the layer into which you want to insert a photo.
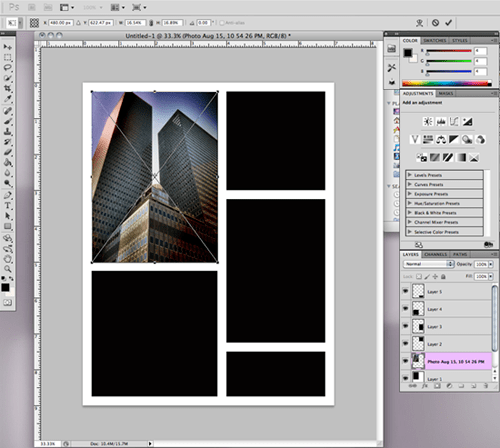
Using the Move arrow, drag and drop your photo onto the layer. You will see a cross on your photo which means your photo is now a Smart Object. Holding the Shift key down, click on a corner square and resize your photo into the black space, using the Smart Guides to help visualize placement. Holding the shift key down while you resize allows your photo to be kept proportional. When the placement is correct, hit the Return/Enter key to commit the photo to the layer. Continue to do this for all the photos in your collage.
Once all of your photos are in the storyboard, go to the top menu, select Layer and then Flatten Layers. Save your storyboard in the file type you want. I use JPEG or PNG. You can make a board that is just squares, or make a diptych or triptych. It’s very versatile. I find that the PNG loads faster on WordPress.
Voilà! Really simple to do and you can achieve some elegant results.


